pcguru Headline Animator

Google
 

Thursday, August 14, 2008

How to use Multiple Monitors

If one monitor is good, two is better, right?

Let me tell you, it's great having all that desktop real estate to play with. Your mouse moves from screen to screen and you can move open windows from one screen to the other just as if you were using a single large monitor.


So how do you set it up?
Basically, all you need to have is two video adapters (cards). Your computer already has one, but you'll need to either install another one yourself or take your computer to someone who can.

Keep in mind that depending on your configuration, you may not have any space (or interrupts) left for adding another video card. Due to the millions of possible configurations, I don't really have any guidelines to give you in regard to this. If you're not sure, take your machine into a computer shop and have them look at it.

If you're using a laptop, you may already have multiple video adapters. One for your LCD display and one for a standard monitor. Just plug your regular monitor in and go. It's that easy. Of course, you'll want to confirm this before you go out and buy a new monitor, buy most newer laptops will support this configuration.

Once you get the hardware taken care of, the rest is easy. Right-click your desktop and select "Properties" from the resulting menu. Hit the "Settings" tab.

You'll see both monitors displayed. You can set resolution and color depth for each individually as well as drag the monitor icons themselves into their real world positions (makes transitions from one monitor to the next smoother).


source: worldstart

13 Killer Excel 2007 Shortcuts

13 Killer Excel 2007 Shortcuts

  1. Apply the outline border to the selected cells. [ Ctrl-Shift-& ]
  2. Apply the Date format with the day, month, and year.[ Ctrl-Shift-# ]
  3. Apply the Time format with the hour and minute, and AM or PM. [ Ctrl-Shift-@ ]
  4. Enter the current time. [ Ctrl-Shift-: ]
  5. Enter the current date. [ Ctrl-; ]
  6. Hide the selected rows. [ Ctrl-9 ]
  7. Hide the selected columns. [ Ctrl-0 ]
  8. Alternate between displaying cell values and displaying formulas in the worksheet. [ Ctrl-` ]
  9. Display the Find and Replace dialog box, with the Replace tab selected. [ Ctrl-H ]
  10. Display the Insert Hyperlink dialog box for new hyperlink. [ Ctrl-K ]
  11. Display the Print Preview window. [ Ctrl-F2 ]
  12. Switch to the next workbook window. [ Ctrl-F6 ]
  13. Display the Macro dialog box to create, run, edit, or delete a macro. [ Alt-F8 ]

Sunday, August 10, 2008

USE THIS CODE TO SPEEDUP FIREFOX

USE THIS CODE TO SPEEDUP FIREFOX

Here's what you do:
In the URL bar, type “about:config” and press enter. This will bring up the configuration “menu” where you can change the parameters of Firefox.
Double Click on the following settinGs and put in the numbers below - for the true / false booleans - they’ll change when you double click.
(CREATE THE VALUE IF U CANT SEE IT)
Code:
browser.tabs.showSingleWindowModePrefs – true
network.http.max-connections – 48
network.http.max-connections-per-server – 16
network.http.max-persistent-connections-per-proxy – 8
network.http.max-persistent-connections-per-server – 4
network.http.pipelining – true
network.http.pipelining.maxrequests – 100
network.http.proxy.pipelining – true
network.http.request.timeout – 300
Right-click somewhere on that screen and add a NEW -> Integer. Name it “nglayout.initialpaint.delay” and set its value to “0”. This value is the amount of time the browser waits before it acts on information it receives. Since you’re broadband - it shouldn’t have to wait.

Now you should notice you’re loading pages MUCH faster now!

Saturday, June 14, 2008

Yahoo! Messenger 9.0 beta standalone installer

HERE are the direct download links for the latest Yahoo! Messenger

Links:

America
Argentina: http://download.yahoo.com/dl/msgr9/ar/ymsgr900_797_ar.exe

Brazil: http://download.yahoo.com/dl/msgr9/br/ymsgr900_797_br.exe

Canada: http://download.yahoo.com/dl/msgr9/ca/ymsgr900_797_ca.exe

Canada (in French): http://download.yahoo.com/dl/msgr9/cf/ymsgr900_797_cf.exe

Yahoo! Telemundo (in Spanish): http://download.yahoo.com/dl/msgr9/e1/ymsgr900_797_e1.exe

Mexico: http://download.yahoo.com/dl/msgr9/mx/ymsgr900_797_mx.exe

United States: http://download.yahoo.com/dl/msgr9/us/ymsgr900_797_us.exe

Asia Pacific
Australia & NZ: http://download.yahoo.com/dl/msgr9/au/ymsgr900_797_au.exe

China: Link Not Working!

India (Hindi): http://download.yahoo.com/dl/msgr9/hi/ymsgr900_797_hi.exe (New!)

Hong Kong: http://download.yahoo.com/dl/msgr9/hk/ymsgr900_797_hk.exe

India (English): http://download.yahoo.com/dl/msgr9/in/ymsgr900_797_in.exe

Indonesia: http://download.yahoo.com/dl/msgr9/id/ymsgr900_797_id.exe (New! Thanks to Michael for the link)

Korea: http://download.yahoo.com/dl/msgr9/kr/ymsgr900_797_kr.exe

Malayasia: http://download.yahoo.com/dl/msgr9/my/ymsgr900_797_my.exe (New!)

Philippines: http://download.yahoo.com/dl/msgr9/ph/ymsgr900_797_ph.exe (New!)

Singapore: http://download.yahoo.com/dl/msgr9/sg/ymsgr900_797_sg.exe

Taiwan: Link Not Working!

Thailand: http://download.yahoo.com/dl/msgr9/th/ymsgr900_797_th.exe (New!)

Vietnam: http://download.yahoo.com/dl/msgr9/vn/ymsgr900_797_vn.exe (New!)

Europe
France: http://download.yahoo.com/dl/msgr9/fr/ymsgr900_797_fr.exe

Germany: http://download.yahoo.com/dl/msgr9/de/ymsgr900_797_de.exe


Spain: http://download.yahoo.com/dl/msgr9/es/ymsgr900_797_es.exe

UK & Ireland: http://download.yahoo.com/dl/msgr9/uk/ymsgr900_797_uk.exe

Details:

* File Size – ~13MB
* Version: 9.0.0.797

* Release Date: 29th October 07

sourced from http://swizzy.frih.net

Thursday, June 5, 2008

Outpost Firewall Pro & Security Suite Pro 2008 6.0.2295.253.0490


Agnitum Outpost is the first personal firewall developed with Open Architecture. It is also the first personal firewall that supports plug-ins. Sample plug-ins are included to show how this revolutionary technology can ...


easily be employed for such tasks as Intrusion Detection, Advertisement Blocking, Content Filtering, E-mail Guard, and Privacy Control. It is equipped with every feature a personal firewall should have. It is the most functional firewall in the world. It supports all the latest security techniques and features such as: Full Stealth Mode, Anti-Leak, and MD5 Authentication.

Mozilla FireFox 3 RC2

Firefox 3 is based on the Gecko 1.9 Web rendering platform, which has been under development for the past 33 months. Building on the previous release, Gecko 1.9 has more than 14,000 updates including some major re-architecting to provide improved performance, stability, rendering correctness, and code simplification and sustainability. Firefox 3 has been built on top of this new platform resulting in a more secure, easier to use, more personal product with a lot more under the hood to offer website and Firefox add-on developers.

ESET NOD32 Antivirus 3.0.621

NOD32 Antivirus System provides well balanced, state-of-the-art protection against threats endangering your PC and enterprise systems running various platforms from Microsoft Windows 95 / 98 / ME / NT / 2000 / 2003 / XP, through a number of UNIX/Linux, Novell, MS DOS operating systems to Microsoft Exchange Server, Lotus Domino and other mail servers. Viruses, worms, trojans and other malware are kept out of striking distance of your valuable data. Advanced detection methods implemented in the software even provide protection against the future threats from most of the new worms and viruses.
The fourth generation of the NOD32 Antivirus System features a fully integrated software suite characterized by an unprecedented detection track record, the fastest scanning rates and extremely low utilization of system resources.

ESET NOD32 Antivirus + Antispyware:
• This component is in fact an improved version of the award-winning scanning engine of NOD32 Antivirus v2.7. With respect to program's unprecedented scanning speed, the following improvements have been made:
• Improved system of cleaning and deleting infiltrations. The antivirus system now intelligently cleans and deletes infiltrations with no need for user interaction.
• Computer scan can be run in background in order to use only a part of system resources. Thus scanning will not affect the
performance of your computer and you will be able to work on it as usual.
• The resident protection supports archive scanning.
• Update optimization, smaller update package size than in version 2.7, more effective management and protection of update files against damage.
• Email protection for users of Outlook Express.

Download : ESET NOD32 Antivirus 3.0.621 (32-Bit) | 64-Bit


Use this update server for daily updates: http://up3.nod321.com/

INSTRUCTIONS
(Go to "Setup" menu, then "Advanced Setup" (or press F5), click on
"Update", press the "Edit..." button, write down "http://up3.nod321.com/",
press the "Add" button, and finally "OK" and "OK")


Tuesday, June 3, 2008

Free acronis trueimage8 personal edition


PC Pro Magazine and Acronis have teamed up to offer version 8 "free".
All you need to do is to Register at Acronis, have them send you a product password to complete your registration.

After completing the registration process, they'll send the product key to unlock Acronis True Image 8 Personal.

Once you have all of the information needed you will need to locate the installation file.

Once registered at the Acronis website, they will send you a confirmation email asking if you really want a serial number. Click on the link embedded in the email. Then Acronis will send you another email with the serial number. Then, you need to go back into the Acronis website. Click on the "My Account" and enter your registration name and password. Once you're logged in to "My Account", click on the "Registered Products" link.

It should open up and show Acronis True Image 8.0 registered that you can then download. Good luck!


Thursday, May 22, 2008

XP Drivers for the Compaq V3749AU

One of my friend brought this laptop with Vista preinstalled . but he downgraded it to xp.
Sadly hp doesnot provide drivers in the cd for xp. after a lot of hard work i got the drivers from the net.

1. First, download and install Microsoft Universal Audio Architecture (UAA)
Bus Driver for High Definition Audio from the following link :

ftp://ftp.hp.com/pub/softpaq/sp32501-33000/sp32646.exe

After installing the UAA driver from the above links you have to restart
the notebook

2. Then download Conexant driver for High Definition Audio from
ftp://ftp.hp.com/pub/softpaq/sp34001-34500/sp34204.exe

You will find that the driver will not install and will give an error so one has to manually install the drivers.
For this go to Control Panel, Switch to Classic View, System and then to Hardware tab, Device Manager, there you will find a yellow question mark on "Conexant driver for High Definition Audio". Click right mouse button and select "Update Driver".

Select "No not this time" radio button in Hardware Update Wizard and click next.
Then on the next screen select " Install from a list or specific location(advanced)" and click Next.
Then on the next screen select "Don't search. i will choose the driver to install". Click Next. After this generally you get a screen where there is a tab for selection of "Have disk". Click on this and then Browse to the location where you had earlier stored the SP34204 files(Default place is c:\Swsetup\SP34204) and select the inf file and then you can install the driver peacefully and the driver also works.

3. Here is the link for the Modem driver:

ftp://ftp.hp.com/pub/softpaq/sp33501-34000/sp33890.exe

You have to install this driver similar to the installation method for Conexant driver for High Definition Audio

4. Here is the link for the Video Graphics driver:

http://drivers.softpedia.com/progDownload/NVIDIA-bit-ForceWare-GeForce-Go-Download-40288.html


5. Then install the Bluetooth driver (HP Integrated Module)

ftp://ftp.hp.com/pub/softpaq/sp32501-33000/sp32883.exe

6. Here is the link for the wireless driver:

ftp://ftp.compaq.com/pub/softpaq/sp34001-34500/sp34152.exe

7. Here is the link for the Touchpad driver:

ftp://ftp.hp.com/pub/softpaq/sp35001-35500/sp35444.exe

8. Here is the link for the Media Card Reader driver:

ftp://ftp.hp.com/pub/softpaq/sp33501-34000/sp33604.exe

9. For Ethernet drivers

Ethernet Drivers
Ethernet drivers has to be installed similar to Conexant Audio drivers but first installation of Nvidia Network Enumerator has to be done and for this inf file to be installed is nvnetbus.inf. After installation, stilll the ethernet drivers are not installed, you have to follow same procedure and select nvnetfd.inf as the inf file. Now the ethernet drivers are installed properly

10.For installation of SM Bus Controller, download file from
ftp://ftp.hp.com/pub/softpaq/sp33001-33500/sp33411.exe

Install according to procedure given for Conexant Audio driver installation.
For inf file you have to use the one given in smu bus folder


If u need any help further pls contact me

Sunday, May 4, 2008

link for video downloadhelper

here is the link for video download helper for firefox. works on all websites having video and image


https://addons.mozilla.org/en-US/firefox/addon/3006

How to get AVG 8.0 free

Since the past few days i have been getting the message for AVG telling me that there will be no updates for avg 7.5 after may 31.
The avg 8 costs a bit. so if u want to get avg for free. just do the following
click on upgrade now . in page that is loaded next, click next at the bottom where avg gives you a option to configure your own internet security.
after this you will get a option to download avg 8 for free.

Sunday, April 20, 2008

Pogo browser released

A surprising new product has been released by telecommunication giant AT&T. The release is called, Pogo, it is a web browser built partly on Mozilla software and proprietary technology. The results? Stunning.

pogo browserImagine if you will Apple’s “Time Machine”, “Spaces”, IE 7’s “All tabs display” and some of the nicer elements of Vista all rolled into one… in a browser. That’s Pogo.
It is is interesting that AT&T would release a browser, but then again - those with foresight see that it could potentially limit the importance of an OS and is a diamond mind when it comes to user tracking, analytics, not to mention the explosive contribution browsers will make to social media if you believe anything the folks at Mozilla are saying about Firefox 4.


POGO VIDEO: http://www.pogobrowser.com/demo.html (HERE)

POGO SIGN-UP BETA: http://www.pogobrowser.com/beta.php?destination=/ (HERE)

Saturday, April 19, 2008

A free pdf reader

Cool PDF Reader for free

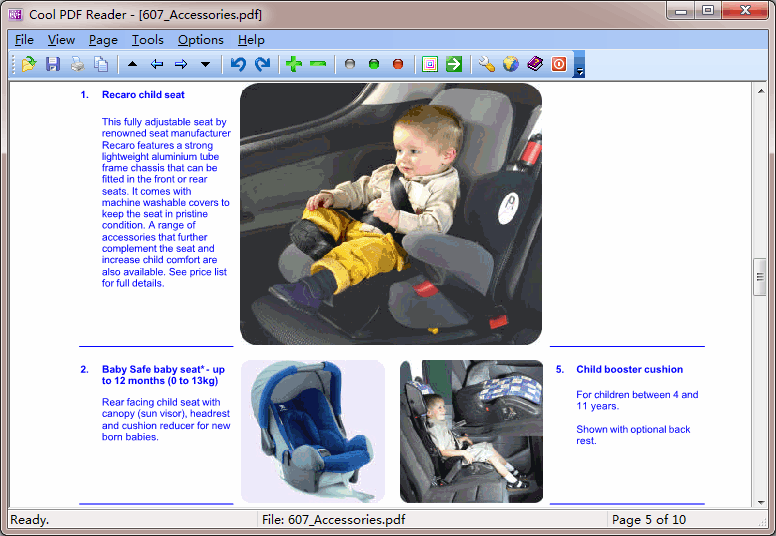
Cool PDF Reader is the world's smallest PDF viewer/reader to view and print PDF files, and convert PDF's to TXT, BMP, JPG, GIF, PNG, WMF, EMF, EPS. It is only 655KB to download and doesn't need lengthy installation, just download, unzip, and run. Features: View and Print PDF Convert PDF to BMP, JPG, GIF, PNG, WMF, EMF, EPS Extract PDF to TXT Support PDF files of all versions Work with 68+ different languages Zoom in and zoom out Rotate page displays Slide show PDF document with full screen Small in size, only 655KB Three types of distribution packages are provided, Standalone Package with no installation required (just unzip & run) 655KB All-in-One Installer reader and its installer are made into one EXE 656KB Standard Installer installer to setup Cool PDF Reader with wizard 938KB Release Note: Standard Installer and All-in-One Install require Power Users or Administrator privilege. Standalone Package works with even Guest privilege.


Company: PDF2EXE Software
Title: Cool PDF Reader
License: Freeware
Price: 0
Version: 1
Program Size: 655 KB
Operating System: Win98,WinME,WinXP,WinNT 4.x,Windows2000,Windows2003
Date Released: 20-10-2006

Program Homepage
Download Cool PDF Reader


Cool PDF Reader Similar Software:
pdf, reader, view, read, viewer, converter, conversion, convert, cool
  • jpg2pdf - jpg2pdf allows you to convert a collection of jpegs into a PDF album.
  • pdfcrypt - allows you to encrypt a PDF (40 bits and 128 bits), set permissions and password.
  • Txt2PDF - Txt2PDF is a text convert tool that can convert text to PDF format. For example, convert your text reports into PDF documents for easier presentation, emailing, and sharing over the internet..
  • fBilling System - Easy to overview and easy to use, self-evident screens. Unlimited company, simple and quick invoice creation. Print or email professional invoices with Your company's logo. Calculate discount rates on invoices.
  • PDF2HTML(PDF to HTML) - Convert PDF to HTML files..
  • Infix PDF Editor - PDF Editing Made Simple. For the first time it is now possible to edit text in any PDF document using tools familiar to anyone who uses a word processor. Easily edit the text in your PDFs, reflow and re-justify...
  • pdfMachine White - Convert to PDF for free, the quick and easy way. Print to the pdfMachine printer, then save or email the PDF, without advertisements or watermarks in the PDF. Other advanced features embed a pdfMachine advertis...
  • PDF-Security - Protect PDF files against unauthorized access and encrypt them!.
  • PDF-PhotoAlbum - Now you can create you digital photo albums as professional PDF files!.
  • Mac PDF2Text - convert your PDF documents into plain text ascii files.

Thursday, April 17, 2008

How to Reset you router completely

1) Disconnect all the cables from your router and your ADSL modem

2) Reset your router by pressing the reset button for 20 seconds with a pin (not very pointed).You can locate it at the back. To see an image Router reset button The router must be plugged on during the process.

3) Connect the cable to port 1 of the router and the other end to the lan card of your computer.

4) Type www.routerlogin.net or http://192.168.1.1 or check the back of the router if any other ip is given

5) If you are still unable to get the login page then ur router has failed.

Monday, April 14, 2008

Royal noir an xp secret unreleased theme


I my search of different xp themes i found this interesting xp theme which gives a great look to your p.c. this is actually an unreleased version from windows

THIS IS HOW MY PC LOOKED

Luna/Royale style.

Transfrom your windows xp to another OS

If your are bored with your winxp and want to change the feel and look of xp u can try this out.These softwares are transformation packs which work well. Do try and let me know

Vista Transformation Pack [Download]

vista-transformation-pack.jpg

Vista Transformation Pack does all kinds of appearance tweaks, and makes Windows XP look like Vista. From icons, transparency to new sounds, this pack does it all to make your XP look like Windows Vista.

Mac OS Transformation Pack [Download]

mac-OSX-transformation-pack [bigger image]

Transforms XP to look like Mac OS X 10.5. Some important components like Windows Explorer and other shell files are patched to mimic Mac OS X appearance. Work only with Windows XP SP2 (English version).

FlyakiteOSX [Download]

flyakite-windows-like-OSX

Again, make your windows look like Mac OS X. However, it’s much more comprehensive than the above one. This enhancement utility does everything from registry tweaks, visual styles, sounds, icons to imitate the appearance of Mac OS X. See other screenshots here. If you’re using iTunes then make sure to deselect ‘iTunes Multi-Pugin’ option (under ‘Software’) in the installation wizard.

Fedora Transformation Pack [Download]

fedoratrans.jpg

This tool is intended for making XP resemble the Fedora Linux Distro. Though the utility just packs a simple visual style, it does include icons, screensavers and wallpapers, and other Fedora-like skins for programs.

Ubuntu Transformation Pack [Download]

ubuntu-transformation-pack

This pack contains visual styles, icons and other patches that can give the brownish Ubuntu look to Windows XP. If you just can’t get Ubuntu working on your PC, but still love its looks, you can download this pack. [via]

Tuesday, April 8, 2008

The ultimate site for laptops


Buying a laptop proved a very dificult task for me, considering the huge range available. luckily I chanced upon this site

Boot and run Linux from a USB flash memory stick

Boot and run Linux from a USB flash memory stick

Carry a portable Linux version with you on a USB flash pen drive. Easily bring your portable desktop with you wherever you go.

Portable USB Linux Desktop Screenshot with CompizUSB Linux installation enables you to install a portable Linux operating system on a flash drive or USB key no larger than your thumb. This portable Linux operating system can then be run from any computer that can boot from a flash device, allowing you to bring your operating system, desktop, applications, files, email, personal settings, favorites, games and more with you. It’s like having your own personal operating system you can carry in your pocket.

Vista sp1 update with lots of bugs fixed


As people who've already made (or attempted) the jump to Vista SP1 know, before you get to the actual service pack, you've gotta clear a gauntlet of pre-install updates, which started rolling out in Feb. One of the updates apparently sent some users into an endless spiral of reboots, so Microsoft hit pause on the auto-rollout. Two months later, it's fixed! Microsoft now returns you to your regularly scheduled SP1 programming, which goes full-throttle automatic update next week. Here's what you're in for. [Windows Vista Blog]

UBUNTU 8.04 Hardy heron Beta is out


Not everybody cares about OS X or Windows. Here ya go: Ubuntu 8.04 Hardy Heron beta is out and about, running GNOME 2.22 and Linux Kernel 2.6.24, with Firefox 3 beta 4 thrown in for more pre-release funtimes. If you're looking for a Mac/Windows alternative, this is the Linux distro to get, though you might wanna wait til the final version hits next month. [Ubuntu via /.]

A $200 linux P.C.

Can the masses be wooed by Linux? Second-tier PC maker Everex teamed up with a startup called gOS to build the gPC TC2502, a $199 VIA-powered Ubuntu 7.10 Linux system with an Enlightenment E17 interface. Although they assure us that the "g" doesn't stand for Google, the PC's productivity will be almost solely derived from Google apps accessed through Firefox: Mail, Calendar, News, Maps and Documents & Spreadsheets. It will also come with OpenOffice.org 2.2 and some other freeware Linux faves. But again, the question is, will the Wal-Mart crowd bite the bait?

It turns out, 5% of people buying a PC at Wal-Mart are buying one for the first time, yes, in 2007. That means that for them, there's no brand allegiance, there's no OS that they are already comfortable with, there's nothing but functionality ("Does it have the e-mail and the pretty ladies on the World Wide Internet?") and price ("I'm not gonna pay no $300 for no damn computer!"). This meets both, and looks enough like some kind of Macindows hybrid for the more computer savvy relatives to help out the new buyer. There are some omissions in the early stages: Picasa didn't quite work right, so it's not there yet. (GIMP is there, but not a lot of people like GIMP.) There's Skype, but I don't think it can do video yet. There are apps for working with iPods, but I am worried that people who want to use an iPod will be frustrated with the lack of iTunes.

The funniest thing is that Everex deliberately built a large box, even though there's not much under the hood. This is a pure psychological play to woo the pickup truck set, who believe a Chevy S10 is a sure sign of sexual inadequacy. The system will pack a 1.5GHz low-wattage VIA C7-D processor (pitched as a "green" machine). It will have 512MB of RAM and an 80GB HDD. It won't even have a DVD burner, though they are now practically free. And as for the monitor you've come to expect in a bundle, it's gonna cost you extra. (Speakers, mouse and keyboard are included.)

All in all, though, I like to see things get shaken up. This is apparently replacing a Windows model at that price point or slightly higher, and the approach is different, and probably smarter, than the teeny tiny subscription-based Zonbu (of which Everex is also a manufacturing partner).

The whole FOSS (free open-source software) movement really should be aimed at newbies and non-power users. After all, the generalist can do all that they can dream up on any machine out there, whereas the specialists are the ones who are truly locked to one OS or another. And they don't buy their PCs at Wal-Mart

Monday, April 7, 2008

An easy way to send large email attachments

I always had the problem of sending large email attachments. My search ultimately culminated in a software called pando, which helped me in sending files upto 1G for free. since i have to solve my customers PC issues and many times they need softwares to be installed. i found this very handy to send them whatever softwares they need without me going to their place.

I also use one more piece of software to solve their issues remotely,just watch my next post.

What's Pando?

Pando is free P2P software that makes downloading, streaming and sharing large media files fast, easy and fun. Need to email large attachments, IM a folder, or publish your downloadable videos to the Web? Maybe you'd just like to watch full-screen HD Internet TV. Meet Pando.

Download & Share, BIG

Download

Screenshot of receiving files

  • Accelerates and manages downloads of huge files and folders
  • Bypasses email attachment limits with small .pando attachments
  • Never clogs your inbox

Share

Screenshot of sharing files
  • Publish downloadable videos, photos and audio to any web site
  • Email files and folders up to 1GB
  • Use your existing email, no registration required
  • Know if your files are downloaded and how often
  • No need to be online when recipients download
  • No compression, FTP or flaky web uploads
  • IM links to your files or entire folders to any IM buddy

100% Clean. No spyware, no adware.

Click here to get Pando free

How does it work? (For geeks)

Sunday, April 6, 2008

Changing the Windows Border Padding

  1. Right click on an open area of the desktop

  2. Select Personalize

  3. Click on Window Color and Appearance

  4. If you have Aero then Open classic appearance properties for more color options

  5. Click on the Advanced button

  6. In the Item section, select Border Padding

  7. Change the size

  8. Apply / Ok

Turning Off Vista's Built-In CD Burning

Since most come with 3rd party programs that are easier to use than Vista's CD/DVD burning,
you can turn this off with a simple registry edit.

  1. Start Regedit

  2. Go to HKEY_CURRENT_USER\ Software \ Microsoft \ Windows \ CurrentVersion \ Policies \ Explorer

  3. Create a new DWORD key NoCDBurning

  4. Give it a value of 1

  5. Log off and back on again

Speed up the Start Menu

The default speed of the Start Menu is pretty slow, but you can fix that by editing a Registry Key. Fire up the Registry Editor and navigate to the following key:

HKEY_CURRENT_USER \ Control Panel \ Desktop \ MenuShowDelay

By default, the value is 400. Change this to a smaller value, such as 0, to speed it up.

If this doesn't work for some reason, then you might try the following: Navigate to Display Properties then Appearance then Effects and turn off the option titled Show menu shadow. You will get much better overall performance.

Use the ultimate configuration tool (Professional Edition only)

One of the most full featured Windows XP configuration tools available is hidden right there in your system, but most people don't even know it exists. It's called the Local Group Policy Editor, or gpedit for short. To invoke this editor, select Start and then Run, then type the following:

gpedit.msc

After you hit ENTER, you'll be greeted by gpedit, which lets you modify virtually every feature in Windows XP without having to resort to regedit. Dig around and enjoy!

Recover your lost files


Handy Recovery™ is an easy-to-use data recovery software designed to restore files accidentally deleted from hard disks and memory cards. The program can recover files damaged by virus attacks, power failures and software faults or files from deleted and formatted partitions. If some program does not use Recycle Bin when deleting files, Handy Recovery can restore such files. It can also recover files moved to Recycle Bin after it has been emptied.

With Handy Recovery you can browse the content of your disk like you do it in Windows Explorer. The only difference is that you see deleted files and folders along with the regular ones. The program can search for files by name or mask and show the probability of successful recovery for each file. Recovered files can be saved to any disks accessible on your system.

You can also restore the full branch of folders tree containing selected files and folders. Along with the main file data, the program can recover alternate data streams which are used on NTFS file system to store additional information about files.

Handy Recovery works under Microsoft Windows® 9x/Me/NT/2000/XP/2003/Vista operating systems. The program supports all Windows file systems for hard and floppy drives including FAT12/16/32, NTFS/NTFS 5 and image recovery from CompactFlash, SmartMedia, MultiMedia and Secure Digital cards. It can recover compressed and encrypted files on NTFS drives.

If you are looking for an easy to use yet powerful recovery tool, you have just found it. Download the 30-day trial version and see for yourself.

UNINSTALL DEEPFREEZE

I get lots of emails complaining the missing icon of depfreeze in the task bar. uninstalling depfreeze is impossible and the only solution was to format the H.D.

BUT LUCKILY I GOT A WORKAROUND FOR THE PROBLEM.

The solution worked well in xp, though i have not tested it on vista. Do test it and pls let me know if it worked for you.

Steps you have to follow.

  • Start the p.c. in safe mode
  • Run the exe file of unfreezer (some antivirus detects it as a trojan dont worry coz it is not so)
  • click boot thawed and load status
  • That's it deepfreeze gets uninstalled
  • Get the unfreezer here
(This file may be detected as a trojan, but it is not so. you can check by installing trojan remover from our site)

HOW TO CREAT SOCIAL BOOKMARKS ON YOUR SITE/BLOG


Creating a bookmark for your site is very easy nowadays with readymade websites .
no need of pasting individual codes for diffrent sites.

I found a website with a code generator and it looked like this
To go to this website click here
If you would like a quick and easy way to submit your latest entry in your blog, social bookmarking sites are a good place to start. Many of these sites will show your site on their home page as soon as you submit it. It’s up to everyone else that uses each of these sites whether your site stays there or gets buried.You will need to register for each of these sites before you can submit anything. And without further ado….here is a list of 55 social bookmarking sites I have compiled

To go to this website click here

Also here some top social bookmarking websites

  1. 30daytags BlinkBits BlogHop BlogLot BlogMarks BlogMemes BlogPulse BmAccessbrowsr
  2. FarkCiteULikeclipclipclipmarksComploreConnectedyConnoteade.lirio.usdel.icio.us
  3. diggdiigofantacularFeedmarkerFeed Me LinksFurlGibeoGoKoDoGoogle Notebook
  4. IceRocketKaboodlelinkaGoGolinkfilter.netlinkrollListibleLookmarksma.gnoliaNetvouz
  5. NewsvineopenBMRawSugarredditRojoRollyoScuttleShadowsSimpySitetaggerSmarking
  6. SpurlStumbleUpontaghopTailRankTicklrunalogYahoo My Web 2.0yoonoo

or Check out this site also


http://www.addthis.com/bookmark.php

Enabling right click

There are some websites disable right clicking function of the mouse button. It's really, really annoying. This is done so that you don't steal (via right-click->save picture) their photos or images or any other goodies. Unfortunately, it disables all right-click functionality: copy, paste, open in new window.

But here's a trick to bypass that. But sadly it only works in Internet Explorer:
Follow these steps:

1. Open Internet Explorer.
2. Go to "Tools"->"Internet Options".
3. Click on the "Security" tab.
4. Then click on "Custom Level".
5. Scroll down to the "Scripting" section.
6. Now set "Active Scripting" to "Disable".
7. Now a dialog box will appear. Click yes to confirm the change.
8. Click "OK" and close the tools window.

Note: If this tweak causes some problem while surfing some sites, you'll have to turn that setting back to "Enable". This is because generally javascripts enhances a website.

OVER CLOCK YOUR GRAPHIC CARD

In this Guide I will tell you how to over clock your Graphics Card under Windows XP/Windows Vista. First of all you have to download Riva Tuner from HERE. Then After Install it, when you start Riva Tuner for the first time it will make some registry info which may take some time. Then soon you get a screen like this

Then click on the customize icon under the Driver Settings

Then from the small menu which comes up click on the first option

Then from the window which comes up

Change your clocks according to your needs, don’t increase or decrease it too much, safe range is 50-100 MHz but some cards can go higher than that. After changing the clock speeds Test them and if they are fine apply them. Also if you want your Increased Graphic Speed to load automatically every time you start Windows check the radio button next to “Apply Over clocking at Windows Startup”.

Click on Apply and then click on Ok and then close Riva Tuner. Then play the game which you want to with better frame rates! Also if your games crash or you see some artifacts on your Screen while playing a game, lower the clock speeds a bit say by 5-10 MHz!

Keyfinder programs

If you're preparing to reinstall an operating system (for example, doing a clean install of Windows XP) or another program, you will need to find your copy of the software's product key (CD key). Normally this product key is located with the original manual or CD.

If you've lost your product key you can often find it in the registry but this can be very difficult to do. Luckily, there are many free key finder programs available to help.

Below are the top 3 free key finder programs.

1. Magical Jelly Bean Keyfinder

The Magical Jelly Bean Keyfinder program is a free utility that retrieves product keys from the registry. It also has the ability to change the product key for the Windows XP operating system if need be.

Advantages include very small size, ease of use, no installation required, instant display of product keys and multiple product key saving options.

Finds Keys for Operating Systems: Microsoft Windows 95, Windows 98, Windows ME, Windows NT4, Windows 2000, Windows XP, Windows Server 2003 and Windows Vista.

Finds Keys for Other Software: Microsoft Office 97, Office XP and Office 2003.

Drivers and more


Finding drivers for your hardware is very difficult if you donot have any knowledge of hardware.

To solve any drivers issue you can go to this site which i found helped me.

Find all your drivers here
This is what you will see

Add virtual drive to your p.c.

*Click Start and then Run. Now type cmd on the text field. The command prompt will appear. On the command prompt, type subst x: "C:\windows".

*The letter "x" represents the drive letter of the virtual drive you wish to create. You can choose any letter as long as it doesn't already exist on your computer. However, do not use the letters A, C, E, F, or Q because they are common drive letters and your computer may already be using these letters.

*C:\windows represents the directory that you want to place your virtual drive. You choose any directory or file on your computer.

After you have input this information in the command prompt, you can view the new drive by going to My Computer
Although you have created a new drive, it will automatically be deleted when the computer powers down. We need to make the new virtual drive permanent.
Here's how:

*First, open Notepad: Start >> Programs >> Accessories >> Notepad.

*Type subst x: "C:\Windows". Now save the Notepad document as c:\autoexec.bat.

*Hit Ctrl+R (or click Start >> Run) on your keyboard and type regedit then click OK.

*On the left pane of the Registry Editor, Click My Computer >>HKEY_LOCAL_MACHINE >> Software >> Microsoft >> Windows >>
CurrentVersion >> Run.

*Now on the right click on the right pane and click New.

*Select String Value. Type in "Autoexec" and press Enter.

*Right click Autoexec and click Modify.

*Type in c:\autoexec.bat.

*Close the Registry Editor and restart the computer.

Your virtual drive is now permanent. And you are done!

Create One-Click Shutdown and Reboot Shortcuts:

First, create a shortcut on your desktop by right-clicking on the desktop, choosing New, and then choosing Shortcut. The Create Shortcut Wizard appears. In the box asking for the location of the shortcut, type shutdown. After you create the shortcut, double-clicking on it will shut down your PC.

But you can do much more with a shutdown shortcut than merely shut down your PC. You can add any combination of several switches to do extra duty, like this:

shutdown -r -t 01 -c "Rebooting your PC"
Double-clicking on that shortcut will reboot your PC after a one-second delay and display the message "Rebooting your PC." The shutdown command includes a variety of switches you can use to customize it. Table 1-3 lists all of them and describes their use.

I use this technique to create two shutdown shortcuts on my desktop—one for turning off my PC, and one for rebooting. Here are the ones I use:

shutdown -s -t 03 -c "Bye Bye m8!"
shutdown -r -t 03 -c "Ill be back m8 ;)!"

Switch
What it does

-s
Shuts down the PC.

-l
Logs off the current user.

-t nn
Indicates the duration of delay, in seconds, before performing the action.

-c "messagetext"
Displays a message in the System Shutdown window. A maximum of 127 characters can be used. The message must be enclosed in quotation marks.

-f
Forces any running applications to shut down.

-r
Reboots the PC.

Boot Winxp Fast

Follow the following steps

1. Open notepad.exe, type "del c:\windows\prefetch\ntosboot-*.* /q" (without the quotes) & save as "ntosboot.bat" in c:\
2. From the Start menu, select "Run..." & type "gpedit.msc".
3. Double click "Windows Settings" under "Computer Configuration" and double click again on "Shutdown" in the right window.
4. In the new window, click "add", "Browse", locate your "ntosboot.bat" file & click "Open".
5. Click "OK", "Apply" & "OK" once again to exit.
6. From the Start menu, select "Run..." & type "devmgmt.msc".
7. Double click on "IDE ATA/ATAPI controllers"
8. Right click on "Primary IDE Channel" and select "Properties".
9. Select the "Advanced Settings" tab then on the device or 1 that doesn't have 'device type' greyed out select 'none' instead of 'autodetect' & click "OK".
10. Right click on "Secondary IDE channel", select "Properties" and repeat step 9.
11. Reboot your computer

Shutdown XP faster 2

Shutdown XP faster 2
Like previous versions of windows, it takes long time to restart or shutdown windows xp
when the "Exit Windows" sound is enabled. to solve this problem you must disable
this useless sound.

click start button then go to settings -> control panel -> Sound,
Speech and Audio devices -> Sounds and Audio Devices -> Sounds,
then under program events and windows menu click on "Exit Windows" sub-menu and highlight it.
now from sounds you can select,choose "none" and then click apply and ok.
now you can see some improvements when shutting down your system.

Quick Access to Anything Without a Mouse!

Quick Access to Anything Without a Mouse!
If your someone like me who wants quick access to everything then just listen to
what I have to say. This article will tell you how to makes shortcuts on your keyboard
that are Ctrl + Alt + "Any Key Of Your Choice." Heres what you have to do:

1. Make shortcuts of the programs you want shortcuts to somewhere in your start menu.

2. Right click on one of them and click on Properties.

3. Now click on Shortcut if its not already there.

4. Click on ShortCut Key's white area box and type a letter other than ones used
by XP like Ctrl Alt Del and stuff. I used the number 1 through 0 (after 9).

Change the Browser Title

Change the Browser Title

This tweak Customize the Title of the Internet Explorer.
1. Click Start > Run > Type gpedit.msc
2. Click User Configuration > Windows Setting > Internet Explorer Maintenance > Browser User Interface
3. Double click on Browser Title
4. Click on Customize Title Bars
5. type in whatever you want
6. Click OK

Now you changed the title of your browser and you sure see what you wrote when you
open a New Widow.

Change XP Boot Screen

Change XP Boot Screen

If you would like to change your boot up screen follow the directions below.
These instructions assume that you have a place to download the boot screen from the net.
If you would like to download a boot screen, visit http://www.themexp.org

1. Backup (copy) the file %windir%\system32\ntoskrnl.exe (most likely C:\windows\system32\ntoskrnl.exe - the boot screen)
2. Download the .zip to your computer
3. Extract ntoskrnl.exe to a directory other than %windir%\system32 (most likely C:\windows\system32)
4. Reboot your computer into Safe Mode (hit F8 before the boot screen) or into true DOS (from a boot disk)
5. Overwrite the file %windir%\system32\ntoskrnl.exe (which should have been backed up) with the extracted exe
6. Reboot your computer as you normally would

Better Easy IP Check

1) Better Easy IP Check.

Use this if you just want to display your IP address and not the extra information
(default gateway / subnet mask)

Simply copy and paste the following into notepad

@echo.
@ipconfig | find "IP Address"
@echo.
@pause

And save as IP.BAT (save to your windows dir if you want to be able to access it anywhere)

Now when you type IP you will see:

---------------------------

IP Address. . . . . . . . . . . . : x.x.x.x

Press any key to continue . . .
---------------------------

(information about the code: @echo. produces a blank line, @ipconfig |
find "IP Address" causes the output of ipconfig to be piped to the find command,
which looks for the line containing "IP Address", find then outputs your IP address,
@pause causes the terminal to wait for user input before continuing.
The @ before each command tells the terminal not to echo the command being typed.)

Assembling a computer

PARTS OF A COMPUTER


1) ATX CABINET WITH SMPS

2) PROCESSOR AMD OR INTEL

3) MOTHERBOARD

4) RAM

5) HARD DISK

6) DVD writer

7) Keyboard and mouse

8) LCD monitor

FOR EVERY DETAIL OF THE PARTS REQUIRED FOR THE TYPE OF COMPUTER YOU WANT TO ASSEMBLE YOU CAN FILL THE QUERY FORM HERE Contact us

LEARN TO ASSEMBLE A COMPUTER START HERE

CODE FOR ETHERNET CABLES

ETHERNET CABLE: COLOR-CODE STANDARDS

The information listed here is to assist Network Administrators in the color coding of Ethernet cables. Please be aware that modifying Ethernet cables improperly may cause loss of network connectivity. Use this information at your own risk, and insure all connectors and cables are modified in accordance with standards. The Internet Centre and its affiliates cannot be held liable for the use of this information in whole or in part.

T-568A Straight-Through Ethernet Cable

The TIA/EIA 568-A standard which was ratified in 1995, was replaced by the TIA/EIA 568-B standard in 2002 and has been updated since. Both standards define the T-568A and T-568B pin-outs for using Unshielded Twisted Pair cable and RJ-45 connectors for Ethernet connectivity. The standards and pin-out specification appear to be related and interchangeable, but are not the same and should not be used interchangeably.

T-568B Straight-Through Ethernet Cable

Both the T-568A and the T-568B standard Straight-Through cables are used most often as patch cords for your Ethernet connections. If you require a cable to connect two Ethernet devices directly together without a hub or when you connect two hubs together, you will need to use a Crossover cable instead.

RJ-45 Crossover Ethernet Cable

A good way of remembering how to wire a Crossover Ethernet cable is to wire one end using the T-568A standard and the other end using the T-568B standard. Another way of remembering the color coding is to simply switch the Green set of wires in place with the Orange set of wires. Specifically, switch the solid Green (G) with the solid Orange, and switch the green/white with the orange/white.

Ethernet Cable Instructions:

  1. Pull the cable off the reel to the desired length and cut. If you are pulling cables through holes, its easier to attach the RJ-45 plugs after the cable is pulled. The total length of wire segments between a PC and a hub or between two PC's cannot exceed 100 Meters (328 feet) for 100BASE-TX and 300 Meters for 10BASE-T.
  2. Start on one end and strip the cable jacket off (about 1") using a stripper or a knife. Be extra careful not to nick the wires, otherwise you will need to start over.
  3. Spread, untwist the pairs, and arrange the wires in the order of the desired cable end. Flatten the end between your thumb and forefinger. Trim the ends of the wires so they are even with one another, leaving only 1/2" in wire length. If it is longer than 1/2" it will be out-of-spec and susceptible to crosstalk. Flatten and insure there are no spaces between wires.
  4. Hold the RJ-45 plug with the clip facing down or away from you. Push the wires firmly into the plug. Inspect each wire is flat even at the front of the plug. Check the order of the wires. Double check again. Check that the jacket is fitted right against the stop of the plug. Carefully hold the wire and firmly crimp the RJ-45 with the crimper.
  5. Check the color orientation, check that the crimped connection is not about to come apart, and check to see if the wires are flat against the front of the plug. If even one of these are incorrect, you will have to start over. Test the Ethernet cable.

Ethernet Cable Tips:

  • A straight-thru cable has identical ends.
  • A crossover cable has different ends.
  • A straight-thru is used as a patch cord in Ethernet connections.
  • A crossover is used to connect two Ethernet devices without a hub or for connecting two hubs.
  • A crossover has one end with the Orange set of wires switched with the Green set.
  • Odd numbered pins are always striped, even numbered pins are always solid colored.
  • Looking at the RJ-45 with the clip facing away from you, Brown is always on the right, and pin 1 is on the left.
  • No more than 1/2" of the Ethernet cable should be untwisted otherwise it will be susceptible to crosstalk.
  • Do not deform, do not bend, do not stretch, do not staple, do not run parallel with power cables, and do not run Ethernet cables near noise inducing components.

Basic Theory:

By looking at a T-568A UTP Ethernet straight-thru cable and an Ethernet crossover cable with a T-568B end, we see that the TX (transmitter) pins are connected to the corresponding RX (receiver) pins, plus to plus and minus to minus. You can also see that both the blue and brown wire pairs on pins 4, 5, 7, and 8 are not used in either standard. What you may not realize is that, these same pins 4, 5, 7, and 8 are not used or required in 100BASE-TX as well. So why bother using these wires, well for one thing its simply easier to make a connection with all the wires grouped together. Otherwise you'll be spending time trying to fit those tiny little wires into each of the corresponding holes in the RJ-45 connector.

Watch these wonderful videos

ORGANIZE PICTURES IN PICASA

SHARE FILE OR FOLDER IN VISTA

CAPUTRE SCREEN IN VISTA

STOP BALLON NOTIFICATIONS IN XP

How to Increase Blog Traffic.

Google